發佈日期:

How to move the MySQL data directory

Typical DirectAdmin installations have the MySQL data directory located in /var/lib/mysql. The data directory contains the data of the databases and the size increases depending on the usage. In this article you will learn how to move the MySQL data directory to a new location. This is useful when the majority of the disk space is located in /home.

Prerequisites

  • Article is based on CentOS, other OSes may require a small change.
  • A backup of MySQL. Tip: use our backup service.
  • If you are not running the commands as root, use sudo.
  • rsync installed:
yum install rsync -y

Step 1 – Choose the new location

Our CentOS templates have no /home partition but stores it in the / partition. However, if you have a big /home partition, it is best to store the data there. Create the folder /home/mysql using the following command:

mkdir /home/mysql

Step 2 – Shut down MySQL

systemctl stop mysqld

Step 3 – Move the data

rsync -av /var/lib/mysql/ /home/mysql/
mv /var/lib/mysql /var/lib/mysql_backup

Step 4 – Configure MySQL

Open /etc/my.cnf and update (or add) the following settings in the [mysqld] section:

datadir=/home/mysql
socket=/home/mysql/server.sock

Step 5 – Start MySQL

systemctl start mysqld

Check if MySQL works. Log in as root and execute the following query:

mysql -u root -p
select @@datadir;

This should return the new database path.

Step 6 – Remove the old database path

Once MySQL has run for a few days without problems, you can delete the old data directory:

rm -rf /var/lib/mysql_backup
發佈日期:

WordPress on Centos 7 + Nginx + PHP 7 + Mariadb

1.Update the epel-release and install the REPO for remi-php 7

yum -y install epel-release 
sudo rpm -Uvh http://rpms.famillecollet.com/enterprise/remi-release-7.rpm 
yum install yum-utils
yum-config-manager --enable remi-php72

2.add nginx REPO

  • sudo nano /etc/yum.repos.d/nginx.repo

[nginx]
name=nginx repo
baseurl=http://nginx.org/packages/centos/7/$basearch/
gpgcheck=0
enabled=1

3.install nginx , mariadb , php

sudo yum -y update
sudo yum -y install nginx mariadb-server git libpng12
yum -y install php-devel php-mysql php-opcache php-gd php-common php-xmlrpc php-mcrypt php-zip php-cli php-xml php-mbstring php-curl php-fpm 

4.Open firewall port for service

sudo firewall-cmd --permanent --zone=public --add-service=http
sudo firewall-cmd --permanent --zone=public --add-service=https
sudo firewall-cmd --permanent --zone=public --add-service=ftp
sudo firewall-cmd --reload

5.Setup nginx & PHP

sudo systemctl restart nginx
sudo systemctl enable nginx
sudo vi /etc/nginx/conf.d/lab.conf
sudo vi /etc/opt/remi/php71/php.ini
   cgi.fix_pathinfo=0
sudo vi /etc /php-fpm.d/www.conf
   user = nginx
   group = nginx
   listen.owner = nobody
   listen.group = nobody
sudo systemctl restart php-fpm
sudo systemctl enable php-fpm
發佈日期:

CLOSE_WAIT連接過多的現象分析與處理

未分類


1. CLOSE_WAIT的機制和原理一.

來自參考資料:從問題看本質: 研究TCP close_wait的內幕

客戶端主動發起 socket.close時

假設我們有一個client, 一個server.
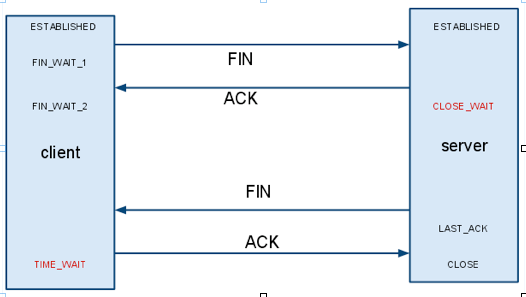
當client主動發起一個socket.close()這個時候對應TCP來說,會發生什麼事情呢?如下圖所示.

client首先發送一個FIN信號給server, 這個時候client變成了FIN_WAIT_1的狀態, server端收到FIN之後,返回ACK,然後server端的狀態變成了CLOSE_WAIT.

接著server端需要發送一個FIN給client,然後server端的狀態變成了LAST_ACK,接著client返回一個ACK,然後server端的socket就被成功的關閉了.

從這裡可以看到,如果由客戶端主動關閉一鏈接,那麼客戶端是不會出現CLOSE_WAIT狀態的.客戶端主動關閉鏈接,那麼Server端將會出現CLOSE_WAIT的狀態.

服務器端主動發起 socket.close 時

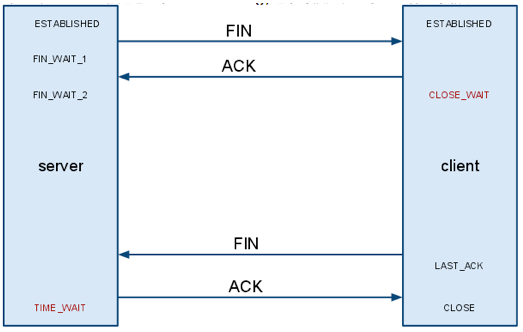
那麼當server主動發起一個socket.close(),這個時候又發生了一些什麼事情呢.

從圖中我們可以看到,如果是server主動關閉鏈接,那麼Client則有可能進入CLOSE_WAIT,如果Client不發送FIN包,那麼client就一直會處在CLOSE_WAIT狀態(後面我們可以看到有參數可以調整這個時間).

結論

誰主動關閉鏈接,則對方則可能進入CLOSE_WAIT狀態,除非對方達到超時時間,主動關閉。

服務器端的設置

如果我們的tomcat既服務於瀏覽器,又服務於其他的APP,而且我們把connection的keep-alive時間設置為10分鐘,那麼帶來的後果是瀏覽器打開一個頁面,然後這個頁面一直不關閉,那麼服務器上的socket也不能關閉,它所佔用的FD也不能服務於其他請求.如果並發一高,很快服務器的資源將會被耗盡.新的請求再也進不來. 那麼如果把keep-alive的時間設置的短一點呢,比如15s? 那麼其他的APP來訪問這個服務器的時候,一旦這個socket, 15s之內沒有新的請求,那麼客戶端APP的socket將出現大量的CLOSE_WAIT狀態.

所以如果出現這種情況,建議將你的server分開部署,服務於browser的部署到單獨的JVM實例上,保持keep-alive為15s,而服務於架構中其他應用的功能部署到另外的JVM實例中,並且將keep-alive的時間設置的更

長,比如說1個小時.這樣客戶端APP建立的connection,如果在一個小時之內都沒有重用這條connection,那麼客戶端的socket才會進入CLOSE_WAIT的狀態.針對不同的應用場景來設置不同的keep-alive時間,可以幫助我們提高程序的性能.

2. CLOSE_WAIT的機制和原理二(附實例代碼)

來自參考資料:
This is strictly a violation of the TCP specification
TCP: About FIN_WAIT_2, TIME_WAIT and CLOSE_WAIT

產生機制

Time to raise the curtain of doubt. Here is what happens.

The listening application leaks sockets, they are stuck in CLOSE_WAIT TCP state forever. These sockets look like (127.0.0.1:5000, 127.0.0.1:some-port). The client socket at the other end of the connection is (127.0.0.1:some-port, 127.0.0.1:5000), and is properly closed and cleaned up.

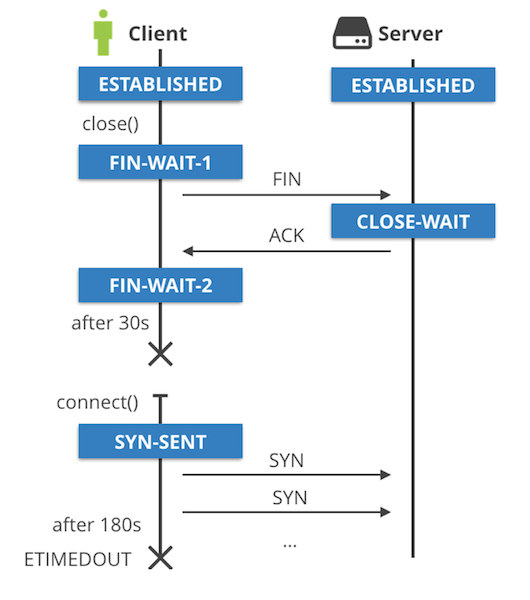
When the client application quits, the (127.0.0.1:some-port, 127.0.0.1:5000) socket enters the FIN_WAIT_1 state and then quickly transitions to FIN_WAIT_2. The FIN_WAIT_2 state should move on to TIME_WAIT if the client received FIN packet, but this never happens. The FIN_WAIT_2 eventually times out. On Linux this is 60 seconds, controlled by net.ipv4.tcp_fin_timeout sysctl.

This is where the problem starts. The (127.0.0.1:5000, 127.0.0.1:some-port) socket is still in CLOSE_WAIT state, while (127.0.0.1:some-port, 127.0.0.1:5000) has been cleaned up and is ready to be reused. When this happens the result is a total mess. One part of the socket won’t be able to advance from the SYN_SENT state, while the other part is stuck in CLOSE_WAIT. The SYN_SENT socket will eventually give up failing with ETIMEDOUT.

sysctl -a |grep ipv4 |grep timeoutkernel.hung_task_timeout_secs = 120net.ipv4.route.gc_timeout = 300net.ipv4.tcp_fin_timeout = 60net.ipv4.tcp_thin_linear_timeouts = 0

實例問題代碼

// This is a trivial TCP server leaking sockets.package mainimport (    "fmt"    "net"    "time")func handle(conn net.Conn) {    defer conn.Close()    for {        time.Sleep(time.Second)    }}func main() {    IP := ""    Port := 5000    listener, err := net.Listen("tcp4", fmt.Sprintf("%s:%d", IP, Port))    if err != nil {        panic(err)    }    i := 0    for {        if conn, err := listener.Accept(); err == nil {            i += 1            if i < 800 {                go handle(conn)            } else {                conn.Close()            }        } else {            panic(err)        }    }}

重現CLOSE_WAIT

啟動服務端

# go build listener.go && ./listener &# ss -n4tpl 'sport = :5000'State Recv-Q Send-Q Local Address:Port  Peer Address:Port    LISTEN  0    128     *:5000              *:*                   users:(("listener",pid=15158,fd=3))

啟動客戶端,用nc

ss -n4tpl 'sport = :5000'State      Recv-Q Send-Q Local Address:Port Peer Address:Port LISTEN     0      128    *:5000                 *:*                   users:(("listener",pid=15158,fd=3))ESTAB      0      0     127.0.0.1:5000   127.0.0.1:47810              users:(("listener",pid=15158,fd=5))

可以看到啟動了一個socket連接,客戶端端口是47810.

殺死客戶端

kill `pidof nc`

服務端連接進入CLOSE_WAIT.

 ss -n4tp |grep 5000CLOSE-WAIT 1      0      127.0.0.1:5000    127.0.0.1:47810               users:(("listener",pid=15158,fd=5))

TCP設計說明

It seems that the design decisions made by the BSD Socket API have unexpected long lasting consequences. If you think about it – why exactly the socket can automatically expire the FIN_WAIT state, but can’t move off from CLOSE_WAIT after some grace time. This is very confusing… And it should be! The original TCP specification does not allow automatic state transition after FIN_WAIT_2 state! According to the spec FIN_WAIT_2 is supposed to stay running until the application on the other side cleans up.

Let me leave you with the tcp(7) manpage describing the tcp_fin_timeout setting:

tcp_fin_timeout (integer; default: 60)      This specifies how many seconds to wait for a final FIN packet before the socket is forcibly closed.  This is strictly a violation of the TCP specification, but required to preventdenial-of-service attacks.

I think now we understand why automatically closing FIN_WAIT_2 is strictly speaking a violation of the TCP specification.

3. CLOSE_WAIT 處理說明

如果您發現與給定進程相關的連接往往總是處於CLOSE_WAIT狀態,則意味著此進程在被動關閉後不執行活動關閉。編寫通過TCP進行通信的程序時,應檢測遠程主機何時關閉連接並正確關閉套接字。如果您未能執行此操作,則套接字將保留在CLOSE_WAIT中,直到進程本身消失。

所以基本上,CLOSE_WAIT意味著操作系統知道遠程應用程序已關閉連接並等待本地應用程序也這樣做。因此,您不應嘗試調整TCP參數來解決此問題,但請檢查擁有本地主機上的連接的應用程序。由於沒有CLOSE_WAIT超時,連接可以永遠保持這種狀態(或者至少在程序最終關閉連接或進程存在或被殺死之前)。

如果您無法修復應用程序或修復它,解決方案是終止打開連接的進程。當然,由於本地端點仍然可以在緩衝區中發送數據,因此仍然存在丟失數據的風險。此外,如果許多應用程序在同一進程中運行(就像Java Enterprise應用程序的情況一樣),那麼終止擁有進程並不總是一種選擇。

我沒有嘗試使用tcpkill,killcx或者cutter強制關閉CLOSE_WAIT連接但是如果你不能殺死或重啟持有連接的進程,那麼它可能是一個選項。

4. 查看CLOSE_WAIT的ip與端口連接對

netstat -tulnap | grep CLOSE_WAIT | sed -e 's/::ffff://g' | awk '{print $4,$5}' | sed 's/:/ /g'

結果舉例:

172.26.59.197 8088 54.241.136.34 44690172.26.59.197 8088 171.48.17.77 47220172.26.59.197 8088 54.241.136.34 57828172.26.59.197 8088 157.230.119.239 55920172.26.59.197 8088 157.230.119.239 59650172.26.59.197 8088 157.230.119.239 44418172.26.59.197 8088 157.230.119.239 47634172.26.59.197 8088 157.230.119.239 34940

每一行是一對CLOSE_WAIT的socket連接。示例是服務器端的連接。

5. 殺死 CLOSE_WAIT的perl代碼

源代碼:
https://github.com/rghose/kill-close-wait-connections/blob/master/kill_close_wait_connections.pl

apt-get install libnet-rawip-perl libnet-pcap-perl libnetpacket-perlgit clone https://github.com/rghose/kill-close-wait-connections.gitcd kill-close-wait-connectionsmv kill_close_wait_connections.pl /usr/bin/kill_close_wait_connectionschmod +x /usr/bin/kill_close_wait_connections

已經將其代碼放置 http://39.106.122.67/ctorrent/kill_close_wait_connections.pl
不必通過git下載。

ubuntu 準備

apt-get install libnet-rawip-perl libnet-pcap-perl libnetpacket-perl

CentOS準備

yum -y install perl-Net-Pcap libpcap-devel perl-NetPacket
curl -L http://cpanmin.us | perl - --sudo App::cpanminus
cpanm Net::RawIP
cpanm Net::Pcap
cpanm NetPacket

安裝

wget http://39.106.122.67/ctorrent/kill_close_wait_connections.pl
mv kill_close_wait_connections.pl /usr/bin/kill_close_wait_connections
chmod +x /usr/bin/kill_close_wait_connections

執行

kill_close_wait_connections

6. 殺死tcp 的其他命令與說明

資料1來源

Kill an active TCP connection
https://gist.github.com/amcorreia/10204572

Kill an active TCP connection內容

Some notes on killing a TCP connection…

Info gathering

(remember to be root!)

  • lsof | awk '{ print $2; }' | sort -rn | uniq -c | sort -rn | head
    • lsof | grep <PID>
  • netstat -tonp
  • Killcx deps: libnet-rawip-perl libnet-pcap-perl libnetpacket-perl
  • tcpkill deps: dsniff

Motivations

CLOSE_WAIT related

資料2來源

Kill tcp connection with tcpkill on CentOS
https://gist.github.com/vdw/09efee4f264bb2630345

Kill tcp connection with tcpkill on CentOS 內容

Install tcpkill

yum -y install dsniff --enablerepo=epel

View connections

netstat -tnpa | grep ESTABLISHED.*sshd.

Block with ip tables

iptables -A INPUT -s IP-ADDRESS -j DROP

Kill connection

tcpkill -i eth0 -9 port 50185

Block brute forcing – iptables rules

iptables -L -niptables -I INPUT -p tcp --dport 22 -i eth0 -m state --state NEW -m recent --setiptables -I INPUT -p tcp --dport 22 -i eth0 -m state --state NEW -m recent  --update --seconds 600 --hitcount 3 -j DROPiptables -A INPUT -p tcp --dport 22 -m state --state NEW -m recent --set --name ssh --rsourceiptables -A INPUT -p tcp --dport 22 -m state --state NEW -m recent ! --rcheck --seconds 600 --hitcount 3 --name ssh --rsource -j ACCEPTservice iptables saveservice iptables restart

7. 參考資料

從問題看本質: 研究TCP close_wait的內幕
https://www.cnblogs.com/zengkefu/p/5655016.html

This is strictly a violation of the TCP specification
https://blog.cloudflare.com/this-is-strictly-a-violation-of-the-tcp-specification/

https://github.com/cloudflare/cloudflare-blog/blob/master/2016-08-time-out/listener.go

TCP: About FIN_WAIT_2, TIME_WAIT and CLOSE_WAIT
https://benohead.com/tcp-about-fin_wait_2-time_wait-and-close_wait/

http://rahul-ghose.blogspot.com/2014/11/removing-closewait-connections.html

kill-close-wait-connections
https://github.com/rghose/kill-close-wait-connections

Kill an active TCP connection
https://gist.github.com/amcorreia/10204572

[命令行] curl查詢公網出口IP
https://blog.csdn.net/orangleliu/article/details/51994513

發佈日期:

Linux 使用 rsync 遠端檔案同步與備份

rsync 是 Linux 系統上最常被用來複製與備份檔案的工具,它可以處理本機或遠端的檔案同步工作,藉由 rsync 指令可以讓管理者很方便的將兩地的資料同步,不管是同一台電腦或是透過網際網路連線的兩台伺服器,使用方式都類似,以下是 rsync 的使用教學以及常用的指令範例。

rsync 簡介

rsync 的角色就像是一般 Linux 的 cp 與 scp 指令,可以將檔案或目錄從來源位置複製到目的位置,不過 rsync 在複製檔案時會比 cp 與 scp 更有效率,並且支援連結檔與設備檔(devices),也可以保留檔案的擁有者、群組與權限設定,

rsync 在第一次複製檔案時,會複製完整的檔案內容,而之後再次複製檔案時,就會先以 delta transfer 演算法檢查新舊檔案之間的差異,只傳送有變動的部份,可加快備份速度,尤其是在累進備份大檔案時,效果更明顯。另外 rsync 在使用網路傳送資料時,也支援資料的自動壓縮與解壓縮,這樣可以有效減少耗費的網路頻寬。

安裝 rsync

大部分的 Linux 發行版都會內建 rsync 工具,如果您的系統沒有安裝,通常也都可以透過系統的套件來安裝。Red Hat 系列的 Linux 可用 yum 安裝:

sudo yum install rsync

Debian 系列的 Linux 則可用 apt-get

sudo apt-get install rsync

rsync 基本用法

rsync 的基本語法結構如下:

rsync 參數 來源檔案 目的檔案

以下是最常見的幾個參數:

  • -v:verbose 模式,輸出比較詳細的訊息。
  • -r:遞迴(recursive)備份所有子目錄下的目錄與檔案。
  • -a:封裝備份模式,相當於 -rlptgoD,遞迴備份所有子目錄下的目錄與檔案,保留連結檔、檔案的擁有者、群組、權限以及時間戳記。
  • -z:啟用壓縮。
  • -h:將數字以比較容易閱讀的格式輸出。

rsync 最簡單的用法就是複製本地端的檔案:

rsync -avh myfile.gz /home/pi/tmp/
sending incremental file list
myfile.gz

sent 14.34M bytes  received 35 bytes  28.67M bytes/sec
total size is 14.33M  speedup is 1.00

其效果就跟 cp -r 類似,可將 myfile.gz 複製到 /home/pi/tmp/ 目錄中,不過如果執行第二次時,rsync 就會自動跳過沒有變動的檔案:

rsync -avh myfile.gz /home/pi/tmp/
sending incremental file list

sent 74 bytes  received 12 bytes  172.00 bytes/sec
total size is 14.33M  speedup is 166,658.15

這種用法對於檔案或目錄都適用:

rsync -avh /path/to/myfolder /home/pi/tmp/

rsync 遠端備份

rsync 也可以用於不同台機器之間的遠端備份,這樣的用法就跟 scp 指令很像,不過 rsync 會更有效率:

rsync -avzh /mypath/myfile.gz pi@192.168.1.12:/mybackup/

這樣就會將本地端的 myfile.gz 備份至 pi@192.168.1.12 的 /mybackup/ 目錄中,在遇到這種遠端備份的狀況時,rsync 預設會以 ssh 的方式登入遠端的機器,所以在執行這行備份指令之後,要接著輸入pi@192.168.1.12 的密碼,接著就會開始備份資料,輸出會類似這樣:

pi@192.168.1.12's password: 
sending incremental file list
myfile.gz

sent 13.62M bytes  received 34 bytes  48.56K bytes/sec
total size is 14.33M  speedup is 1.05

而這裡我們多加入一個 -z 參數,目的是讓 rsync 可以自動將資料壓縮後再傳送,並在遠端接收到資料後自動解壓縮,減少網路傳輸的資料量。

rsync 也可以將遠端的檔案備份至本地端,其語法也跟 scp 類似:

rsync -avzh pi@192.168.1.12:/mypath/myfile.gz /mybackup/
pi@192.168.1.12's password: 
receiving incremental file list
myfile.gz

sent 30 bytes  received 23.74M bytes  571.98K bytes/sec
total size is 24.14M  speedup is 1.02

這裡的 rsync 在複製檔案時,由於我們加入了 -a 參數,所以可以用於檔案或是整個目錄的備份,相當於 scp -r 的效果,而且由於 rsync 只會傳輸有變動的部份,所以通常在異地備份資料時都會使用這種方式來處理。

限制網路頻寬

如果不想讓 rsync 在透過網路備份資料時,佔用太大的網路頻寬而影響正常的服務,可以加上 --bwlimit 參數來指定資料傳輸的速度上限:

rsync -avzh --bwlimit=100K pi@192.168.1.12:/mypath/myfile.gz /mybackup/
pi@192.168.1.12's password: 
receiving incremental file list
myfile.gz

sent 30 bytes  received 14.34M bytes  99.22K bytes/sec
total size is 14.33M  speedup is 1.00

自訂 SSH 連接埠

正常 ssh 遠端登入服務的連接埠(port)號碼是 22,但有些人為了保護伺服器避免受到太多的網路攻擊,會將 ssh 的連接埠改成其他的號碼,例如 12345,不過這樣的話在使用 rsync 進行遠端備份資料時,就也要跟著指定連接埠號碼。

假設 192.168.1.12 這台伺服器的 ssh 服務連接埠號碼為 12345,以下是透過 rsync 將資料備份資料的範例:

rsync -avzh -e 'ssh -p 12345' /mypath/myfile.gz pi@192.168.1.12:/mybackup/

這裡我們多加入一個 -e 參數,其用途是指定遠端登入所要使用的指令,預設的指令就是 ssh,而這裡我們將指令變更為 ssh -p 12345,也就是使用 12345 這個連接埠登入 ssh 的意思(請參考 ssh 指令的 -p 參數用法)。

顯示傳輸進度

如果要讓 rsync 在傳輸檔案時可以即時顯示進度,可以加上 --progress 參數:

rsync -avzh --progress pi@192.168.1.12:/mypath/myfile.gz /mybackup/

這樣在備份每的檔案的過程就會顯示傳輸的進度、傳輸速度與剩餘時間等資訊:

pi@192.168.1.12's password: 
receiving incremental file list
myfile.gz
         24.14M 100%  623.52kB/s    0:00:37 (xfr#1, to-chk=0/1)

sent 30 bytes  received 23.74M bytes  558.52K bytes/sec
total size is 24.14M  speedup is 1.02

同步刪除檔案

rsync 預設只會將來源端現存的檔案同步更新至目的端(同步所有新增或修改的檔案),但是如果在來源端有檔案被刪除的話,rsync 並不會主動刪除目的端的檔案,這樣可以確保資料被勿刪時,備份檔不會也跟著被刪除。

如果您想要讓 rsync 也同步將不存在於來源端的檔案刪除的話,可以加上 --delete 參數,如果沒有來源檔案只有新增、沒有減少的話,它就跟一般的複製動作相同:

rsync -avh --delete myfolder/ backup/
sending incremental file list
./
data1.txt
data2.txt
data3.txt
data4.txt

sent 432 bytes  received 95 bytes  1.05K bytes/sec
total size is 116  speedup is 0.22

這時候若我們將來源檔案的 data1.txt 與 data2.txt 刪除,並且增加 data5.txt,在執行一次 rsync

rsync -avh --delete myfolder/ backup/
sending incremental file list
deleting data2.txt
deleting data1.txt
./
data5.txt

sent 190 bytes  received 64 bytes  508.00 bytes/sec
total size is 87  speedup is 0.34

這時候 rsync 就會同步將備份端的 data1.txt 與 data2.txt 刪除,並且同時新增 data5.txt

如果這裡我們沒有加上 --delete 參數的話,rsync 就只會新增 data5.txt,不會刪除任何檔案。

備份特定檔案

假設我們的檔案與目錄結構如下:

tree myfolder
myfolder
├── chinese.py
├── data1.txt
├── data2.txt
├── find_edimax.c
└── src
    ├── pack.c
    ├── test1.txt
    └── test2.txt

若要讓 rsync 在備份檔案時,排除所有 *.txt 的文字檔檔案,可以使用 --exclude 參數:

rsync -avh --exclude '*.txt' myfolder/ backup/
sending incremental file list
./
chinese.py
find_edimax.c
src/
src/pack.c

sent 3.91K bytes  received 88 bytes  7.99K bytes/sec
total size is 3.59K  speedup is 0.90

我們可以使用多個 --exclude 來排除多種檔案,例如:

rsync -avh --exclude '*.txt' --exclude '*.py' myfolder/ backup/
sending incremental file list
./
find_edimax.c
src/
src/pack.c

sent 3.74K bytes  received 65 bytes  7.61K bytes/sec
total size is 3.50K  speedup is 0.92

如果只想要備份某些特定的檔案,可以將 --exclude 與 --include 配合使用,例如只備份所有 *.c 的 C 語言原始碼:

rsync -avh --include '*.c' --include '*/' --exclude '*' myfolder/ backup/
sending incremental file list
./
find_edimax.c
src/
src/pack.c

sent 3.74K bytes  received 69 bytes  7.62K bytes/sec
total size is 3.50K  speedup is 0.92

這裡我們加入兩個 --include 來指定要備份的檔案比對規則,*.c 就是包含所有 C 語言的原始碼檔案,而另外一個 */ 的意思是指包含所有的目錄,若沒有加上包含目錄的參數,所有的目錄就會被後面 --exclude 排除,造成所有子目錄中的 *.c 也跟著被排除。最後加上一個 --exclude 排除其餘所有的檔案,請注意 --exclude 要放在 --include 之後,順序不可以對調。

限定備份檔案大小

rsync 也可以依照檔案的大小來選擇備份的檔案,假設在 myfolder 目錄中有以下這些檔案:

ls -l myfolder/
total 15632
-rw-r--r-- 1 pi pi  1658348 Feb  5 09:09 bluez-5.43.tar.xz
-rw-r--r-- 1 pi pi       94 Feb  5 07:57 chinese.py
-rw-r--r-- 1 pi pi     2736 Feb  5 07:57 find_edimax.c
-rw-r--r-- 1 pi pi 14332601 Feb  5 09:09 myfile.gz
-rw-r--r-- 1 pi pi      763 Feb  5 08:02 pack.c

--min-size 可以指定備份檔案的大小下限,例如只備份 1MB 以上的檔案:

rsync -avh --min-size=1M myfolder/ backup/
sending incremental file list
./
bluez-5.43.tar.xz
myfile.gz

sent 16.00M bytes  received 57 bytes  31.99M bytes/sec
total size is 15.99M  speedup is 1.00

而 --max-size 可以指定備份檔案的大小上限,例如只備份 4KB 以下的檔案:

rsync -avh --max-size=4K myfolder/ backup/
sending incremental file list
./
chinese.py
find_edimax.c
pack.c

sent 3.91K bytes  received 76 bytes  7.97K bytes/sec
total size is 15.99M  speedup is 4,012.68

--min-size 與 --max-size 也可以同時使用,例如只備份 1KB 到 2MB 之間的檔案:

rsync -avh --min-size=1K --max-size=2M myfolder/ backup/
sending incremental file list
./
bluez-5.43.tar.xz
find_edimax.c

sent 1.66M bytes  received 57 bytes  3.32M bytes/sec
total size is 15.99M  speedup is 9.62

自動刪除來源檔案

如果想讓 rsync 在備份檔案之後,自動將來源檔案刪除(也就是相當於 mv 的效果),可以加上 --remove-source-files 參數:

rsync -avh --remove-source-files myfolder/ backup/
sending incremental file list
./
bluez-5.43.tar.xz
chinese.py
find_edimax.c
myfile.gz
pack.c

sent 16.00M bytes  received 154 bytes  10.67M bytes/sec
total size is 15.99M  speedup is 1.00

這樣執行 rsync 之後,myfolder/ 目錄會被清空,所有的資料都會被移到 backup/ 目錄中,所以請小心使用,別勿刪重要檔案。

測試 rsync 參數

初學者如果不確定自己的 rsync 參數是否正確,在實際執行之前可以加上 --dry-run 來測試一下,加上這個參數之後 rsync 執行時還是會輸出正常的訊息,不過並不會更動到任何的檔案:

rsync -avh --dry-run --remove-source-files myfolder/ backup/
sending incremental file list
bluez-5.43.tar.xz
chinese.py
find_edimax.c
myfile.gz
pack.c

sent 194 bytes  received 31 bytes  450.00 bytes/sec
total size is 15.99M  speedup is 71,086.85 (DRY RUN)

這樣可以方便使用者檢查自己的參數是否配置得宜。

crontab 定期備份

通常如果要在本地端進行備份,就可以在 crontab 中定期執行這樣的指令,將重要的資料定期備份至指定目錄:

# m h  dom mon dow   command
0 5 * * 1 rsync -a /path/to/folder /path/to/backup/

這樣系統就會在每週一的早上 5 點執行 rsync 備份檔案。

只更新既有檔案

如果在備份檔案時,只想要更新過去已經備份過得檔案,排出新增的檔案,可以使用 --existing 參數。

假設我們過去已經將 myfolder/ 的檔案備份至 backup/ 了:

rsync -avh myfolder/ backup/

而這時候又新增了一個新的檔案:

touch myfolder/new.file

若此時我們只要更新 backup/ 中已經存在的檔案,排除後來新增的,就可以使用 --existing 參數:

rsync -avh --existing myfolder/ backup/
sending incremental file list
./

sent 201 bytes  received 19 bytes  440.00 bytes/sec
total size is 15.99M  speedup is 72,702.46

顯示檔案變動資訊

執行 rsync 時加入 -i 參數可以個別檔案變動的資訊:

rsync -avhi myfolder/ backup/
sending incremental file list
.d..t...... ./
.f...p..... find_edimax.c
>f..t...... myfile.gz
>f+++++++++ new.file
>f.st...... pack.c

sent 14.34M bytes  received 79 bytes  3.19M bytes/sec
total size is 15.99M  speedup is 1.12

加入 -i 之後,每個檔案項目之前會多出一個標示字串,而這個標示字串的欄位有 11 個,分別為 YXcstpoguax,其意義如下:

  • Y< 代表檔案傳送至遠端,> 代表檔案傳送至本地端,c 代表本地端變動(建立目錄等),h 代表硬式連結(hard link),. 代表沒有變動,* 代表其餘欄位有包含訊息(例如 deleting)。
  • X:檔案類型,f 為一般檔案,d 為目錄,L 為連結檔,D 為設備檔(device),S 為特殊檔案(如 sockets 或 fifo)。
  • c:代表檔案內容有變動。
  • s:代表檔案大小有變動。
  • t:代表檔案時間戳記有變動。
  • p:代表檔案權限有變動。
  • o:代表檔案擁有者有變動。
  • g:代表檔案群組有變動。
  • u:保留欄位。
  • a:代表檔案 ACL 資訊有變動。
  • x:代表檔案擴充屬性(extended attribute)有變動。
發佈日期:

Tomcat 安裝 SSL 憑證

如果拿到的憑證是轉好的 .jks 檔案,這時候因為方便整理的關係我將這個.jks 檔案放到 conf 底下,然後只需要到 Tomcat 目錄下的 conf / server.xml 去做修改就好。

<Connector port="443" protocol="org.apache.coyote.http11.Http11Protocol"
               maxThreads="150" SSLEnabled="true" scheme="https" secure="true"
	       keystoreFile="conf/gss.jks" keystorePass="******"
               clientAuth="false" SSLEngine="on" />

如果都沒改過的話,這段原本應該是註解起來的。然後加上 keystoreFile 跟 keystorePass,就設定好了,重新啟動 Tomcat 就可以用 https 連上網站了

如果拿到的憑證是 .crt檔跟.key檔,這時候就比較麻煩了,需要自己去做加密,我這邊會介紹.p12 跟.jks,雖然有些許設定上的不同,但其實加密成.p12 或是.jks 都可以在 Tomcat 執行。 

.p12 檔

首先要先下載 OpenSSL 這邊提供 Windows 下載的版本,跟安裝教學如下:

  1. OpenSSL For Windows 載點 : http://gnuwin32.sourceforge.net/packages/openssl.htm
  2. OnenSSL 安裝教學 : https://www.sslbuyer.com/index.php?option=com_content&view=article&id=128:install-openssl-win7&catid=25:knowledge-news&Itemid=2595

下載並設定好之後就可以 OpenSSL 的指令了,首先將 .crt檔跟.key檔用命令提示字元轉成.p12 語法如下:

openssl pkcs12 -export -in All.cer -inkey openservices.aopen.com.01.key -out openservices.aopen.co-v1.p12

就成功加密出 .p12 檔案了,這時候可以直接上 Tomcat 設定了,設定如下。

<Connector port="443" protocol="org.apache.coyote.http11.Http11Protocol"
               maxThreads="150" SSLEnabled="true" scheme="https" secure="true"
	       keystoreFile="conf/gss.p12" keystorePass="******" keystoreType="pkcs12"
               clientAuth="false" SSLEngine="on" />

這邊需要注意的點除了 keystoreFile 跟 keystorePass 還多了 keystoreType=”pkcs12″ 要去做設定,然後重啟 Tomcat 就成功囉。

.jks 檔

如果不想在 Tomcat 多做設定的話,可以再把 .p12 轉成 .jks ,這時候就要透過 Java KeyTool 工具。

首先需要下載 Java SDK 下載完成後,需要再 Java 底下的 Bin 才能執行 KeyTool ,語法如下 :

/usr/bin/keytool -importkeystore -srckeystore openservices.aopen.com.p12 -srcstoretype PKCS12 -deststoretype JKS -destkeystore openservices-201607-201907-v2.keystore

就能夠轉出 .jks 囉,Tomcat 的設定就如最上面那樣既可。

總結

其實.p12 跟.jks 都能在 Tomcat 下執行,但.p12 需要做型態設定 Tomcat 才能順利的去讀取,.jks 則需要.p12 再用 Java KeyTool 去轉,這邊就看個人取捨了。

這邊也提供將.jks 轉回 .crt 跟.key 的方法

https://serverfault.com/questions/715827/how-to-generate-key-and-crt-file-from-jks-file-for-httpd-apache-server

名詞解釋
  • .key格式:密鑰文
  • .crt格式:證書文件,包含公鑰提供者信息,但不包含公鑰
  • .jks格式 :定義了包含私鑰與公鑰證書的文件格式,是 Java 默認的格式
  • .p12 又稱PKCS12:定義了包含私鑰與公鑰證書的文件格式,其中私鑰採密碼保護
  • PKCS(Public Key Cryptography Standards)是由RSA公司制定的一組關於公鑰加密的標準
發佈日期:

How to re-sync the Mysql DB if Master and slave have different database incase of Mysql replication?

At the master:

RESET MASTER;
FLUSH TABLES WITH READ LOCK;
SHOW MASTER STATUS;

And copy the values of the result of the last command somewhere.

Without closing the connection to the client (because it would release the read lock) issue the command to get a dump of the master:

mysqldump -u root -p --all-databases > /a/path/mysqldump.sql

Now you can release the lock, even if the dump hasn’t ended yet. To do it, perform the following command in the MySQL client:

UNLOCK TABLES;

Now copy the dump file to the slave using scp or your preferred tool.

At the slave:

Open a connection to mysql and type:

STOP SLAVE;

Load master’s data dump with this console command:

mysql -uroot -p < mysqldump.sql

Sync slave and master logs:

RESET SLAVE;
CHANGE MASTER TO MASTER_LOG_FILE='mysql-bin.000001', MASTER_LOG_POS=98;

Where the values of the above fields are the ones you copied before.

Finally, type:

START SLAVE;

To check that everything is working again, after typing:

SHOW SLAVE STATUS;

you should see:

Slave_IO_Running: Yes
Slave_SQL_Running: Yes

That’s it!

發佈日期:

使用py-kms搭建KMS服務器激活環境

py-kms發佈地址(原始):

https://github.com/myanaloglife/py-kms

現在建議用這個,支持2和3:

https://github.com/ThunderEX/py-kms

上面這個人fork了下面的這個項目,下面這個fork了原始項目

https://github.com/matsuz/py-kms


1.安裝依賴

yum install python-argparse

2.下載代碼

git clone https://github.com/myanaloglife/py-kms

3.運行激活服務器

cd py-kms
python server.py

這時候看到提示消息

TCP server listening at 0.0.0.0 on port 1688.

就是說KMS服務已經在1688端口上打開了,沒有錯誤。這就搭建完畢了。

4.長期運行配置
對於需要長期運行的KMS服務器,可以使用supervisor管理py-kms服務(非必須步驟)
拷貝py-kms文件夾到/usr/local/目錄下

cp -r py-kms /usr/local/

安裝supervisor

yum install python-setuptools
easy_install supervisor

生成默認配置文件(supervisord.conf)

echo_supervisord_conf > /etc/supervisord.conf

編寫supervisor腳本,加到/etc/supervisord.conf最後

[program:pykms]
command=python /usr/local/py-kms/server.py
autorestart=true
user=root

以daemon方式運行,執行

supervisord


5.客戶端測試
客戶端下載py-kms後,cd跳轉到該目錄,執行

python client.py -v wwwb.vvvtimes.com

結果如下說明安裝成功

Connecting to wwwb.vvvtimes.com on port 1688…
Connection successful!
Sending RPC bind request…
RPC bind acknowledged.

其中最後一個參數wwwb.vvvtimes.com是服務器的域名或IP,通過py-kms激活沒有機器數目限制,通過微軟官方工具搭建的KMS服務器有機器數目限制。
———————
作者:gsls200808
来源:CSDN
原文:https://blog.csdn.net/gsls200808/article/details/50319981
版权声明:本文为博主原创文章,转载请附上博文链接!

發佈日期:

Mysql Circular replication

Node 1 is master for node2 , node 2 is the master to node 3 , node 3 is master for node1

Node 1 configuration

node 1 my.cnf configuration

server-id       =1
log_bin         =mysql-bin
binlog_do_db    =details
log-slave-updates

create replication account for node 2

create user 'repl'@'%' identified by 'mysqluser';
grant replication slave on *.* to 'repl'@'%';

CHANGE MASTER TO
MASTER_HOST='NODE3-IP',
MASTER_USER='repl',
MASTER_PASSWORD='mysqluser',
MASTER_LOG_FILE='mysql-bin.XXXXX',
MASTER_LOG_POS=XXX;

lock databases and dump to fils , and copy to node 2 , node 3

Node 2 configuration

node 2 my.cnf configuration

server-id       =2
log_bin         =mysql-bin
binlog_do_db    =details
log-slave-updates

node 3 my.cnf configuration

server-id       =3
log_bin         =mysql-bin
binlog_do_db    =details
log-slave-updates